skip to main |
skip to sidebar

There are three main perks to being a preschool teacher.:
A. You get to hang out with kids all day and play games and sing songs and dance and paint.
B. You get to watch children grow and change and learn all the time
C. You get a lot of time off for holidays, and usually some time in the summer!
I work at a small, private preschool, and we are only closed for once week during the summer. I am in the middle of my summer break right now, and finishing up so many wedding related projects. I have run to the craft store three times in less than 48 hours. My next few posts will showcase some finished items.
I bought the boxes for my favors before I had any idea what I wanted to stuff them with. I just love how kraft boxes look, and I found a super deal online! Now that they are packed with favor-y goodness I can show how I got there. I won't be showing you what our favors actually are until after the wedding, since I do want to keep it a surprise, and it seems like half my guestlist now reads my various wedding blogs.
I started with 120 3x3x4 kraft paper boxes, a pad of sepia tone archival ink, and a large wood grain stamp. I thought I would only have to make two stamps on each box, but it turned out I had to make four separate stamps. Pretty time consuming and a bit annoying, but worth it when I look at the finished pile of printed boxes.


Luckily the ink dried quickly, and I was able to stack them while I put together the "gift" part. I closed up the boxes and tied them with some twine from the gigantic roll I had bought for the invitations.


I attached a yellow tag with a handwritten thank you message to each box as well.


Our favors are now all boxed up and ready to go, but the hardest part is keeping them all organized. See, we have three different types of favors for guests to choose from. I probably should have packaged each differently to keep them separate, but I can still add some tissue paper poms in different colors if I really think it will be a problem.
I also made the signs that will sit on the favors table:
 One of three signs, but to show them all would give too much away at this point!
One type of favor can't be put together until two days before the wedding, so for now these are boxed up and siting in my living room. A constant visual reminder of all that the things that have to wait until that last week, the cupcakes, honeymoon packing, the favors. Overwhelming and exciting all at once!
Droooooool. <--- That's me dreaming about all of our wedding food. On a day to day basis, B and I enjoy a pretty simple diet. I am really into clean eating: unprocessed, natural, whole foods. A typical day of eating for me would be a bowl of oatmeal with almond milk and almond butter for breakfast, some berries dipped in almond butter and a veggie/tofu/hummus packed pita for lunch, and a pineapple/mango/papaya/rice milk/soy yogurt smoothie for dinner. I also snack on almonds and blueberries throughout the day. (I can totally munch through a pound of blueberries in a few hours!) Pretty boring, I know. That is why I am SUPER STOKED about eating at the reception! We have had two tastings with our caterer and they have both been perfect. We are still finishing up our menu but so far it is looking pretty spectacular!
Appetizers:
+Tomato pizettes with thyme and olive oil
+White bean puree on homemade sourdough with grilled treviso, cassis vinegar and extra virgin olive oil
+Grilled chanterelle and olive oil crostini
Buffet dinner dishes:
+Tofu lasagna
+Smashed fingerlings with roasted summer vegetables
+Nutmeg and walnut oil dressed grilled summer squash on grilled garlic bread with spicy roasted garlic puree and walnuts
+Fresh cannellini bean ragout with rosemary sage oil, sweet and sour parsley, and roasted garlic on baguette
 (Smashed Fingerlings with Veg, Photo: LMS)
+Baby arugula salad
+A selection of homebaked breads and dipping oils
+Cumin picholine olives and almonds
We are trying hard to balance what we like (tons of fresh vegetables, tofu, beans and Mediterranean flavors) with what our guests would normally expect at a wedding (Tempeh chicken or tofu fish? Probably not the best foods to serve to a large group of hungry omnivores!). Our menu did start off with some other dishes, but we didn't want to scare off too many people, so we subbed some of them with the lasagna. Hopefully the lasagna will be a crowd-pleaser, and I swear you can't taste the tofu. Several of our options will be gluten free, and everything is 100% vegan.
Even though I am incredibly excited about the food, I am even more excited about this:
Our food choices affect the future of our individual and collective lives. Here are some things we are currently doing to walk our sustainable talk:
- we select organic and local produce from Los Angeles area certified farmers markets.
- we drive diesel vehicles fueled with B99.9% biodiesel fuel that we purchase at USA Gas Station on Glencoe and Maxella in Marina del Rey.
- we serve your food on washable china plates, cloth napkins, glasses and real silverware, even for picnics - unless you want disposables, in which case, we use Catergreen.com's compostable utensils and clamshell containers made from potatoes and sugar cane.
- we do not use water bottled in plastic, as many of the plastics you think you're recycling everyday unfortunately end up in a land fill. We use pitchers, and are in the process of transitioning to carbonating our own filtered sparkling water (we currently use sparkling water bottled in glass).
- we use a presoak and prescrub method to clean our dishes, avoiding leaving the water "running" during the manual portion of the dishwashing process.
- we are transitioning into being a zero-waste operation through the recent addition of our composting program (which makes amazing soil for Large Marge's organic home garden!).
- we are in the process of transitioning to solar web hosting for our website (go to www.catergreen.com for more information).
- we are transitioning to sourcing all of our ingredients within 400 miles of production, and most of our ingredients (about 70%) within 100 miles of production, in an effort to adhere to The 100 Mile Diet (more information at www.100milediet.org)
And, most importantly, all of this leads to the most flavorful, beautiful food you can get.
Text Source: Large Marge Sustainables
This was a huge selling point for us when booking our caterer. The other huge selling point? Meg always wrote back to us, and offered as many tastings as we needed to get the food right. When we first started planning the food we had a list of ten caterers to contact. Out of those ten, only four wrote back. We then did tastings with three companies, because the fourth charged $100 per person for a tasting! After sampling the food, Large Marge was the clear winner, and we booked the services right away.
Looking over our menu has made me seriously hungry. Are you having a traditional buffet or plated meal? Or are you going with a more unusual dietary choice?
for a long while before i was a preschool teacher, i was a nanny! i nannied for a few families over the years, and i still keep in touch with all of them. our ring child is my former charge. z is one of the most spectacular, amazing people i have ever met (big or small). he seriously brightens my day whenever i see him.
i really wanted him to have something special to carry down the aisle. i just didn't think a pillow would cut it, and as much as i love those ring warmer bowls, they seemed a bit fragile for a five year old. i decided the perfect compromise would be a book. a hollowed out book. so I went about hollowing out a book myself and it was a DISASTER! project: fail. the piece is so ugly that i can't even show it to you. i won't even let myself look at it.
now i am looking for alternative solutions. i have a few ideas. perhaps just have him carry a small drawstring pouch. or a book tied up with string. or one of these items i already have:
 small paper bag with a gold leaf print? simple, easy, casual.

a book on lessons? not exactly...


it is a hollowed out "security book" (meant for hiding valuables and such) that my grandfather once owned. it came into my possession when he passed away several years ago. the book has special meaning to me because it reminds me SO MUCH of him! he was totally quirky and had tons of weird things like this around. so even though a hollow security book is a little cheesy, i still like the idea!


book-like frida kahlo artbox. it is the right size but maybe a bit clunky. i love that there is string already inside to tie the rings to.
 b bought this for me years ago, and i have been desperately trying to find a way to display it at the wedding. it has been siting on my desk throughout the planning process, but i cant seem to find an appropriate place to incorporate it. i could tie the rings to the top, or have them placed inside.
i'm getting a bit anxious at this point. i think i need to call up z and ask what he wants to carry down the aisle! maybe he will pick a pillow after all...
do you have a ring bearer? what will he/she be using to transport the rings?
b and i are no strangers to photo booths! we jump in and take some shots whenever we can. some of our favorite hangouts happen to have booths, and one of our friends (who is also the fellow who introduced us!) is an awesome photo booth artist.
 a recent strip, and a couple of older strips as well!
having a real, old fashioned photo booth was one of my priorities (after venue, food, music and regular photography). i really wanted a black and white booth that would spit out at least one copy of photos (preferably two). unfortunately, renting such a contraption here in LA was out of our budget. like, waaaaay out of our budget! we could have rented a digital booth for about half the price, but that just didn't sit well with me. i don't like the typical 2x2 print style - if I cant have an old fashioned photo strip, i don't want anything!
after pouting over the cost for a while, i started noticing really cool DIY photo booths. set up a tripod, hang up a sheet, grab a couple of props and you are good to go. i didn't want to take on the entire project, however, so i contacted our photographer to see if she could set something up for us. luckily, she could! check out an awesome example of jordana's photo booth skills here.
since we can't afford the real deal, this is a seriously awesome substitute. in some ways i feel like you can be much more creative with your own photo booth setup! i am trying to personalize it as much as possible. we have an assortment of props, and a chalkboard/whiteboard. i am trying to construct a background that can easily be changed. i want to have a few fabrics hanging (like in a real photo booth) so that guests can choose. maybe one printed background and one plain. i really like these fabrics from ikea:
i hope that our guests spare a minute to have their photo taken, and that the kids aren't too shy to pop in! i am making table signs to remind people where the booth is located, and to help encourage them to check it out and get creative!did you have a DIY (or rented!) photo booth or are you planning one out now? what unique props and ideas did you come up with?

it is really hard for me to write anything about our invitations. getting them out was such a huge, time consuming process. by far the biggest wedding project i have tackled. i am not a designer. let me repeat, i am NOT a designer! i really have no idea where to begin when it comes to putting together different elements and making them all work as a package, but i think that i somehow managed to pull it off here. luckily, i had the help of a friend who IS a designer. let's just allow the pictures to do most of the talking, shall we?
this is what you may have found in your mailbox in June if you were invited to our wedding:

a variety of vintage stamps and lovingly hand traced "calligraphy." it would mean you are an out-of-towner, since we sent our invites in waves and managed to get all of the first batch out in early june.
this is what you may have found in your mailbox in july if you were invited to our wedding:

ah, can we spot the differences? computer printed addresses. and we ran out of high value vintage stamps, so we probably just slapped a couple of forever stamps on your invite and called it a day. this also means you live in los angeles, because we mailed our local invites a month after our first wave. sorry guys, i was just a little tired of making them at this point. in retrospect, we should have made all the invitations together, so i wasn't so burnt out by the end. oh well, we live and learn right?
our return address on the back:

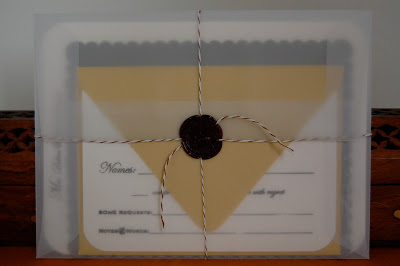
this is what all of our guests found when they opened the outer envelopes. the liner paper was a really expensive indulgence. it is hand screened and thick and amazing! i cut corners by not making our envelope liners full size (more on this in pt. 2)!

our inner envelopes were all tied up with twine and wax. i used a hot glue wax on some invites, and a real sealing wax on others. (the hot glue wax is pictured here.)

frankly, i have no idea if I followed "the rules" on putting these together. i read somewhere to tuck the reply card in the reply envelope and place that on top. put any extra cards/maps etc. under that, and then the invite under all of the above. i think i did this? Hopefully i didn't offend anyone!
front and back of sealed inner envelope:

once you managed to tear/bite/cut off the twine, and rip open the hard to tear envelope, this would be on top. our reply card and envelope. i used a mustard colored envelope and that same wood grain paper for liners.


we used a mix of forever stamps and the cute king and queen stamps on these cards.
under the reply card is our information card. we made it seem almost like a valet parking card, because we need to emphasize that all guests must use the valet service or their cars will be towed. our venue is in a residential neighborhood with no guest parking at all. i am so worried about people skipping the valet and trying to park their own cars and then being towed.iI am hoping everyone will read this card and remember to use the free valet!

the actual invitation card:


 on the back we printed lyrics from our favorite song. there is also a tiny spider dangling off of the banner (although spiders terrify me, they are also good luck!).
all together now:


behind the scenes of an invitation photo shoot (secret cat helpers):


stay tuned for project: invitations (pt. 2): cost breakdown, tips and tricks and maybe another cat or two!


 One of three signs, but to show them all would give too much away at this point!